Mesh Import
What are Mesh actors
Meshes are actors used to display complex objetcs, animated things, players, weapons and much more. To get the most out of them, you have to create them with an external Modeling tool such as 33sMax, Maya, Blender, Anim8tor etc... They have to be imported and saved in .u files in Unreal and are mostly found in the Decoration class.
Mesh are much more optimized than BSP surfaces, so that you can have much more Meshes on screen than BSP without experiencing serious framerate drop. On the other hand, Meshes are fully displayed as soon as they are in linf of sight, even if only a tiny part of them is visible. This make using large meshes hazardous and potentialy reduces performances.
Modeling Guidelines
The complete mesh must not be larger, taller or wider than 256 units in every directions. If you are using an animated mesh, the whole animation must be contained in this space. You can delete faces from your mesh and leave holes where the player is not able to see : the mesh doesn't have to be close, so that you can save memory by deleting useless polys. You can pack a lot of details on your mesh as the number of trianlges doesn't seems to be very limited.
Once the mesh has been completely done, you have to unwramp the UV mapping, that is, tell which part of a texture will be visible on each triangle. You can't use textures larger than 256 units. This is a painful and boring part of the process. Most modeling tools let you apply an automatic unwrapping, but in most cases, you will still have to do most of the work by hand.
The object must have a name ending in 01, even if it is a single frame object (like a still rock). The reason is that Unreal uses theses sequenced names to create animations. If you import a file with a number of frames, they have to be name blablabla01, blablabla02, and there can be no gap in the sequence (no 02 =>06 etc...)
Exporting
To export the file, save it as a .3ds file. This is 3dsMax's basic format. Blender can export it. Maya should be able to do so, or you might find a converter somewhere. Then, you need the 3ds2unr tool.
'Note : this step will require script'
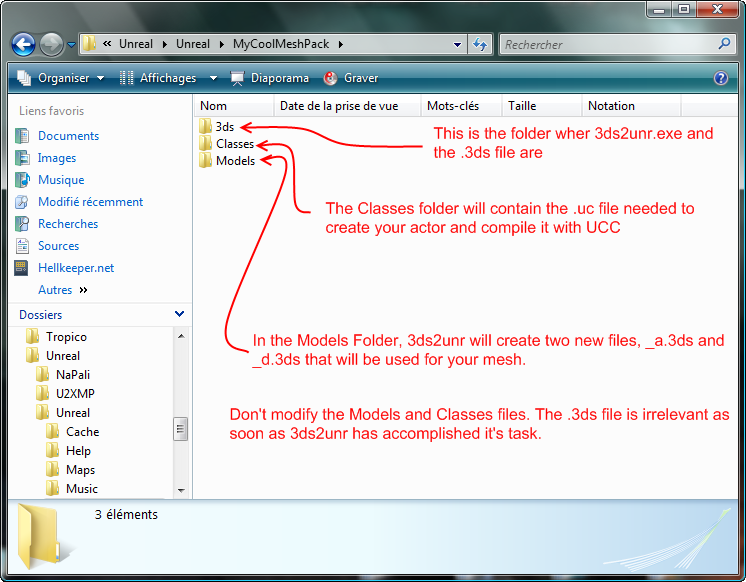
First create a folder somewhere. Name it MyCoolMeshPack. In this folder, put a second folder which name is unimportant. In this folder, put your .3ds file and the 3ds2unr.exe program. Run 3ds2unr and a window will pop up asking you to choose a folder. Choose your newly created MyCoolMeshPack folder and click OK. This should create two new folders, Models and Classes :
Now, you have to tell 3ds2unr to do his work. In Start menu => Run (or type in the search bar if you're using Vista), enter the complete path to 3ds2unr followed by the name of the class you will be using or creating, and the name of the file you want to convert. If you don't set a class name, it will be exported in it's own class directly. In my case, the command will be D:\Unreal\Unreal\MyCoolMeshPack\3ds\3ds2unr MeshModified.3ds
If you are importing an object with several animations, put every animations in it's own .3ds file, and type something like d:\Unreal\Unreal\MyCoolMeshPack\3ds\3ds2unr NewAnimatedCharacter *.3ds
The * character will select every .3ds file found in the file. This way, you can import an object with several animations (walking, jumping, scratching is head).
If everything works, you 3ds2unr will close and you will have the new files in your Classes and Models directory. In my case, I have the files MeshModified_a.3d and MeshModified_d.3d in Models and MeshModified.uc in my Classes folder.
