Difference between revisions of "Importing vertex meshes into Unreal"
| Line 18: | Line 18: | ||
For this tutorial I will use '''Blender 2.80'''. The plugin for blender works flawless in this version I don't know if there will be future updates for the plugin for newer Blender versions. | For this tutorial I will use '''Blender 2.80'''. The plugin for blender works flawless in this version I don't know if there will be future updates for the plugin for newer Blender versions. | ||
== Part 3a) Preparing Your Mesh - | == Part 3a) Preparing Your Mesh - Boundary Box == | ||
<br> | <br> | ||
The most important part is that your mesh is inside of a | The most important part is that your mesh is inside of a boundary box with a size of 256 x 256 x 256 Unreal units.<br> | ||
[[File:BoundaryBox.jpg|256px]] | [[File:BoundaryBox.jpg|256px]] | ||
Revision as of 22:17, 22 March 2021
Part 1) Intro
Unreal Engine 1 is one of the older engines which seems to be user unfriendly when it comes to importing new animated meshes into the game.
In this tutorial I like to share my workflow how I prepare and export meshes from blender and get it into Unreal / Unreal Tournament.
I will use my new RocketCan mesh which I made for Unreal Redux as example.
Part 2) File Formats And Blender Plugin
Unreals vertex mesh format requires two different files for the import.
A _a.3d which stores the vertex animation timeline and a _d.3d which stores the mesh data like the UV Map and materials / poly flags.
Thankfully Skywolf wrote an exporter for Blender which allows exporting meshes in the right formats!
Link to the thread + downloads: Skywolfs Blender Vertex Mesh Importer / Exporter Plugin
For this tutorial I will use Blender 2.80. The plugin for blender works flawless in this version I don't know if there will be future updates for the plugin for newer Blender versions.
Part 3a) Preparing Your Mesh - Boundary Box
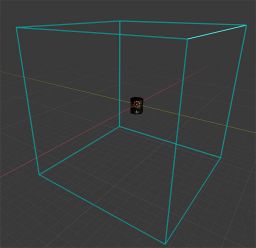
The most important part is that your mesh is inside of a boundary box with a size of 256 x 256 x 256 Unreal units.

If the mesh leaves that box caused by an animation or if it is bigger, your mesh will get cut and vertices will merge during the import progress.
To check the right sizing and max out your animation range you can download this Cube.obj
File:256Cube.7z
In case you don't want to download the file you can convert the default Cube Builder Brush from Unreal to a static mesh - export it as .obj and import it into blender.
Part 3b) Preparing Your Mesh - Timeline Animation
I setup an simple armature system for the mesh which includes an "Open" and "Close" animation.
- Frame 1 is the "default" position or the "Still" position the mesh.
- Frame 3 is the "Open" postion
- Frame 5 the "Close" position.

TIP: If you have looping animations make sure the last frame of an animation is the same frame as the start frame.
Part 4) Exporting Timeline Animationset.
Make sure your mesh is not split into different objects. It's important that all animated parts are stored in one object. Otherwise you will export only one part of it.
If your mesh is only one object select it in Object Mode.
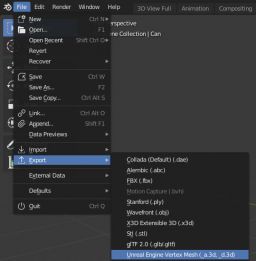
Then go to file → export and select Unreal Engine Vertex Mesh (_a.3d, _d.3d)

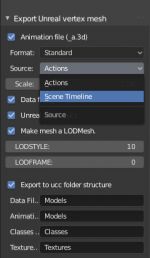
Then choose a name for your Mesh and select under the point "Source:" Scene Timeline
I also recommend checking "Exporting to UCC folder Structure". This generates for you a preset for the import information which I will explain later in Part X)

If no error after hitting export occurs your mesh have been exported successfully.
IMPORTANT: Before you export your mesh, make sure you deleted the Boundary Box if you used it.
Part 5) The .uc file
Now comes the most difficult part. We need write some additional import information into the .uc file.
TO BE CONTINUED!!!!

